Tuesday 25 June 2013

A year in Pre-School, done and dusted!

Well, that's it. A year as a Pre-School teacher. Amazing.
I have to say, this year has been magic. I feel incredibly blessed.
  • I have a job
  • I have a job in childcare, which is what I studied!
  • I work in a wonderful pre-school, where everything that is good about the early years is celebrated on a daily basis
  • I work with a brilliant team of staff, who love their jobs
  • I got to know an amazing group of children, who I'm going to miss very much!

It makes me happy to see the children completely ready for Big School. I'm proud that I contributed to that in some ways, and it makes me think "Yep, I was meant to be a pre-school teacher!"
I'm so proud of the children and their accomplishments (from being able to ask "Can I play too?" to identifying Africa on the map!).
I really believe that this experience of education will give them a lifelong love of learning. You can already see it in their faces when you're showing them a worm wriggling through a wormery, or when you read a book about penguins in Antarctica and they have 112 questions!
Even if they have little set-backs in their education in the future (maybe they'll find a particular subject challenging), they'll always have this year- the best possible introduction to education, in a fun and playful environment, working with their interests at their own pace.

And now, while I go on my holidays (Wow what a busy year, and I am tired!), I'll still be looking at new children's books in the corner of my eye, and wondering how I could incorporate that egg box into an arts and crafts project! I'm so excited for next year!

To all the Moms and Dads reading, I wish your children all the best in their future! Please pop in some time and let me know how they're getting on!
No time to get emotional now, tomorrow is our big Party, with jelly and ice-cream and games and songs!

I love my job.


Sunday 12 May 2013

Bits and Pieces

Just a small update on some of our latest crafts.
Working with Aistear, I decided to do a little project on well-being and self-confidence. I cut out paper people and the kids painted them to look like themselves. I went around the table and asked each child something they liked about themselves. To start the ball rolling, I first told the kids what I liked about them.
I kept to focusing on dispositions and skills, rather than appearance or knowledge. It's nice to instill a sense of who you are from a young age, and to identify what you love about yourself.
Once the people were painted and had dried, we stuck on eyes (we used googly eyes and stickers, and the kids chose their own preferences) and cut hair from wool and glued it on.


We turned our project into a display for the families to enjoy too, and I got a real thrill watching the kids identify themselves to their families, and pointing out their friends too.

Here's a close up:
That's supposed to be me on the left, but of course you already knew that! I made another for my boyfriend and now they live on our fridge door, proudly smiling out at us!


They homemade playdough that I mentioned in a previous post got put on the back-burner until I could find a better recipe. Unfortunately, I couldn't find one, but I still had one group who hadn't had a chance at messy play that week. So I decided to try something else, and we made our own paint!


This was a very easy task. Again, the kids all experienced some measuring, mixing, heating (though that was the adults' job!) and got an early start on these scientific principles.
The paint was very gooey, so we used it as finger paint, rather than trying to spread the thick mixture with brushes.
This turned into such a sensory experience, and the kids loved smearing it around. It was nice for them just to experience the movement and feel of the paint as well, rather than focusing on creating specific pictures.
Our paint didn't last long, and it's already all gone!
If anybody would like the recipe to make at home just let me know!

At the moment, we're doing some work with clay (more sensory exploration, I love it!) and celebrating the start of Summer (whenever it would like to arrive) by playing outdoors a lot, and making paper windmills.

We have a simple game at the moment which is developing their gross motor skills, balance, and recognising letters and the sounds they make.

I draw out the alphabet in a huge square on the concrete outside the pre-school. The kids all hop around on top of the letters and when I say "Stop!" they freeze on whatever letter they've landed on.
I ask them if they can identify the letter, and if they can we try to figure out a word beginning with that sound. For example, one little boy stopped on 'M' and identified the word 'Mummy'. So we walked around like Mummies until I said "Stop!" again, and we picked another letter. They adore this game, as it's so silly and they get to demonstrate their knowledge of sounds.

Bye for now!

Wednesday 17 April 2013

Our Growing Story

We've been doing a lot of learning around the area of growing and planting recently. As it's Springtime, and a lot of the families in the setting live in the countryside, the children have been very aware of flowers growing and little animals popping up around the place.
I started with a project on learning about planting. We all planted a little pot of cat grass (the reason being that it begins to sprout after roughly 5 days, and it was nice for the children to see the results of their work without waiting a couple of weeks).


We each made a little book, called I Know How Seeds Grow. It was four pictures, which the kids coloured in and I stapled together, showing the story of a seed growing into a flower.
The next part of our project was really really fun. I collected a few bits and bobs from the second-hand shop, and asked one of the kids' dads to bring in some straw for us. And we made a....

Scarecrow!
It was a little bit tricky assembling him as a group, but we all learned about turn-taking and co-operation, so that was nice! He was named 'Dally', a mixture of the two most popular names- Daddy and Sally!

As you can see in the picture, he protected our plants as they grew,and we made sure to move them and let them get enough light, and watered them often. The kids were excited when they started to sprout, and they brought them home to plant after about a week.

We sang a song about our scarecrow at circle time:
I'm a little scarecrow,
raggedy and worn.
I wear a hat
and my shirt is torn.
When the crows fly here
I wave and shout
"Away from my garden,
Now get out!"

The interest in growing and planting continued after the project. My boss did 'The Importance of the Sun' and another girl at work crafted gorgeous sunflowers with the kids.
And so I decided to go with it, and keep their interest piqued. So we went on a little nature walk, collected dandelions, leaves, pine cones and pebbles. We made sure not to disturb anything that was growing.
 
With what we had collected (and lots more that I had sorted out behind the scenes) we took apart our home corner, and made our very own Garden Centre!


This has been such a hit, and the kids are so engaged when they play here. They enjoy 'planting' and replanting, pruning, watering, and looking after their seeds and plants!

I borrowed some of our aprons we use for painting and hung them at one side- they wear these when they 'work' in the garden centre.

We have a basket where we keep the leaves and flowers that we picked (as you can see, some of them aren't surviving as well as I'd hoped!)

We kept the cash register, and our basket of vegetables. Sometimes they stick the vegetables into the pots and 'grow' carrots and potatoes!

I made little seed packets, using a mixture of flowers the kids were aware of and some that they might not be. I filled them with the leftover seeds from the cat grass project.

As you can see, you can buy everything in the garden centre. This helps them to recognise numbers in the environment, and learn about counting, and adding. They've enjoyed this side of things too, with their pretend money in the cash register.

The final part of the garden centre project was when we made our own playdough, and used it to 'plant' lavender in (making it smell lovely). This however was only a partial success. They enjoyed making the playdough (measuring, mixing etc...) and using sticks as rollers, and pebbles for making patterns. But the more they used the playdough (and I'm talking minutes here, not over a period of days) the stickier and less usable it became! Well, we live and learn I suppose! And what I learned was I don't want to spend another evening scrubbing homemade playdough off every surface. So that wee project has been temporarily abandoned, until I find a better recipe! Bye for now!

Wednesday 13 March 2013

Spriiiiing!

The handprint trees are back for the new season, and here's how they're looking...
Step 1: We practice using a sissors by snipping up a piece of paper.
Step 2: Draw the outline of each child's hand on brown paper. Draw a circle around the hand.
Step 3: The kids cut out the circle. I cut out the hands. (Too pernickity for little people)
Step 4: Kids glue their hands onto a piece of yellow paper. Then they cut out a strip of brown paper and glue it underneath their hand.
Step 5: Fun part, the fingerpainting! The kids dot on little buds on the branches, and some grass on the ground.

Our Spring Poem goes like this:

I can see it's Springtime,
It's Springtime,
It's Springtime,
And I am so glad.

With green grass
and flowers
and sunshine
and showers,
I can see it's Springtime
and I am so glad!

I've also been working on a little craft for Mother's Day.
I cut out a big speech bubble out of card, and took a picture of each child holding it beside their head. They thought this was absolutely hilarious, and they loved looking back through the photos.
Here's mine:
Yep, I made one too, and my Mom loved it, ha!

I cut frames out of card, and the kids painted them in bright colours. Then my collegue gave me some lovely little foam hearts, and the kids stuck them around their pictures.
I printed off the photos and stuck them in the frames, and then made little envelopes to pop them into. At least then there was some chance the Moms wouldn't see the little presents until Mothering Sunday!


We're doing a little project on planting and growing at the moment, and I'll do a quick run through on that next time! Bye!

Thursday 7 February 2013

New Year, New Room!

Happy New Year everybody! I hope it's great so far, I know it is here at pre-school!

So, alrighty, I never did that second post about the Christmas projects like I said I would. Everything got rather busy around Christmastime as you can imagine, and I never found the time. It feels silly to write it now so I'll give it a skip. Basically it was a little book we made about the story of the First Christmas. I drew 5 scenes from the tale, and if anybody would like the free printables please just leave a comment and I'll email them on to you :)

So, new beginnings! (Although I realise it is now February...) I was evaluating all I've done over the last term and decided there were a few areas I wanted to pay more attention to. I've been doing a lot of crafts and art and table work, and it had become a focus. I thought that maybe this wasn't fair. I do it because it's something I'm good at and something I love, but that's not the case with every child in the pre-school. So! Time to proivde lots more opportunities for different types of play and exploration.
I'm lucky enough to have my own room, and so this is what I did...


The Book Corner
I wanted to create a space where the kids could be cosy and comfortable; a space to chill out, get some head-space, read a book, share a story.
I loved the idea of a permanent blanket fort, and started practicing. This is how it turned out:


I like it, it's cosy and gives opportunities for quiet time, personal space and reflection. But it feels like it could be better! Suggestions are welcome!

The next area I wanted to tackle was pretend play. So I made a home corner! I was just working with what I have (which is quite a lot thanks to my generous boss!), but I really like how it came together:


 There's a little bench made up to look like a bed. (Since I took this photo I also have a little basket for a crib, with a cute doll inside), a kitchen table, and some storage for clothes.


One of the girls I work with offered me a loan of her gorgeous fabric food. They have proved a huge success! There's a basket of fruit, a basket of vegetables, a birthday cake, ice-creams, some knitted buns, and a bread board with sandwich making things! They're ridiculously cute, and are constantly in use. I also made little games with a felt board and some sticky-back velcro, in which we sort our fruit and veg!


I went to the local second-hand shop and bough some little plates, cups, a tea-pot and a pot. They're all 'real', i.e. ceramic, and this offers a really nice alternative to plastic. It's great to offer children miniatures or actual objects, rather than pretend things ALL the time. Kids love to imitate the adults in their lives, and so let's give them opportunities to make it more real.


 This is the dressing up corner. Since I took this picture it has quadroupled in size! I managed to find loads of really gorgeous things in the second-hand shop; fairy costumes, tiny tuxes, a dinosaur tail; straw hats; little graduation robes, and loads of little bits and pieces. A girl at work found a bunch of gorgeous hallowe'en costumes in a bargain bin, and bought them for us. So now there's lions, flowers, dinosaurs and dragons roaming about! Soon I hope to get a little rail to hang them on. Putting things back on their hangers will be learning a little life-skill in itself!


This is our little art table. It's always accesible to the kids, and readily stocked with pencils, crayons, chalk and different types of paper. I hang their art on the wall beside the table, for inspiration!


I lay out a soft mat on one part of the room, and keep different types of blocks and construction toys next to it. They also make floor jigsaws in this area. It's a designated space for this type of play, so that other children strolling around the room won't accidentally knock over a tower or step on a jigsaw.


Meanwhile, outside in the hall, I set up a Parent's Library! We all put out a couple of books we've picked up over the years. A check-out book sits on the far end of the shelf, and parents write in their name, the book they're borrowing, and the date.


All the books are related to children and childcare, and range from curricular guides, such as Aistear, and child development and pyschology books, to fun things to do with your kids and silly joke books about parenting.

So that's all for now!
My next post won't take two months, hopefully, and I'll update you on our Spring Things!

Tuesday 4 December 2012

Christmas Crafts!

I know it's a wee bit early to be getting excited about Christmas, but when you're surrounded by kids who are constantly chatting about Santa and BabyJesus (yep, they run the two words into each other, such is their enthusiasm!), Christmas trees and the hope of snow, it's impossible not be feel so merry!
So here's our Chistmas Crafts!

Snowman Jars

My original plan had been to replicate an project I did when I had some work experience in a Steiner school. We made very similar jars, but instead of doing snowmen, we made a leaf pattern. The snowmen were too sweet to pass up, after I saw the little face here.

Step 1: Organisation!
I put up a poster asking parents to bring in used, clean jam jars. We were soon up to our ears in them, it was great! Then I got some silicone paper. It's just like baking paper, but it's practically clear, not brown. I cut it into strips wide enough to wrap around the jars.
I cut out some orange triangles for noses, and punched a LOT of holes in black paper for 'coal' for the eyes and smiles (the kids could probably do that last step themselves, but I was stuck to time constraints on this one).

Step 2: The kids each took a strip of silicone paper and covered one side in pva glue. Then they arranged little faces using the shapes I cut out. This part was fun, and sticky! All their little fingers were covered in glue and neatly making faces was a challenge! They did a good job though!

Step 3: Wrap the glue-y side of the silicone paper around the jars, and pop a tea-light inside. They're so pretty! I'm making a whole bunch myself, for Christmas decorations!


Christmas Trees

This project takes mere minutes and has great results.

Step 1: Cut out semi-circles from green card.
Step 2: The children decorate the card with markers and stickers.
Step 3: Bend the card into a cone shape and tape together.
Step 4: Stick a paper star on top and a kitchen paper tube on the bottom and voila! Christmas trees!


Gingerbread Men

My Dad is a baker (I know, heaven), and he gave me a big box of undecorated gingerbread men he made. I bought some icing pens, sprinkles and mini Smarties and let the kids go loopy! They really enjoyed this one, probably cos I let them nibble away as we worked. We tried to save some to send home, but I don't know how successful we were. Here's one before he met his untimely end...


We're doing one more Christmas Craft, but I'll post about that one next time. It's time consuming, I'll tell you that much! Feels only right I should devote a whole post to it!

Hope you're enjoying all the Christmas buzz! :)

Sunday 2 December 2012

Winter Fun!

November was a busy month, I didn't get a chance to sit down and write once! We started preparation for our Christmas Play. Early, I know, and the songs are on constant repeat in my head now, but still fun!
I split my sides laughing at the kids dancing away and getting really serious about the whole business.

Here's an update on November's Crafts.

We did some more handprint trees. I think I'm going to do these every season now, and put them together in one big sheet for the kids to take home at the end of the year. It'll be a lovely momento of their time in pre-school!
This time, instead of doing outlines of their hands in crayon, we did handprints with brown paint. The snow flakes came in the form of white finger prints, and we tore up some crepe paper to make the frosty ground. Here's everything you'll need:


And here's how they look when it all comes together!


Another sweet winter project we did was make cloud mobiles. I found this lovely craft on another blog, and altered it slightly. You can find the original here.

We painted cardboard clouds in blue, grey and white, then waited for them to dry.


I cut out a bunch of mittens from felt, in all different colours. It would have been nice for the kids to do this themselves but felt is tricky, and their cutting skills aren't up to it yet.
They did however do the next part themselves, which was to cut twine, (I tied it to the mittens then) and sellotape the twine to the back of the clouds. The final piece was a little copy of our winter poem. I photocopied it on coloured paper and gave them out. Here's the finished things!


I think they look brilliant! Our Winter poem goes like this:


The Winter wind blows,
The Winter wind blows.
Icy fingers, icy toes!
Bright red cheeks and a bright red nose!
It gives me the shivers!
From my head to my toes.


In November, we also learned about shape. I played a game called Hunt the Shape.
Step 1: Present the children with a large paper shape. Name it.
Step 2: Tell the children to close their eyes, then you hide it somewhere in the room (somewhere pretty obvious, like stuck to the wall)
Step 3: Ask one of the children to 'Find the ______', and name the shape again.
Step 4: When the child finds it and brings it back, ask 'Is this a _____ (shape)?', and when the children confirm it is, burst into a round of applause!
Step 5: Repeat with all the children.

When they have the hang of this, present a few shapes at a time, and hide them all together. Then say "Can you find the circle?" I think this one really helps them to identify their shapes, and the praise from the other children really spurs them on!

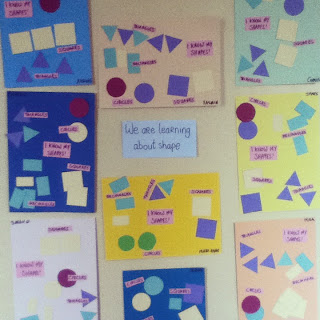
We also did Shape Collages, matching shapes to their friends. Just some matching and sticking in this activity, but they really enjoyed it.


Then, at the end of the project we coloured in a picture of a Shape Robot. We said "Let's colour in all his squares first" and "Next let's do his triangles!". At the end, we named the robots, just for the craic. There were some gems, like Zia, Buzz and Sean.


So, November was a busy month! And December is looking much the same! We're doing a couple of sweet Christmassy Crafts, and we are having so much fun. I love being a pre-school teacher, the magic of Christmas will never go away!